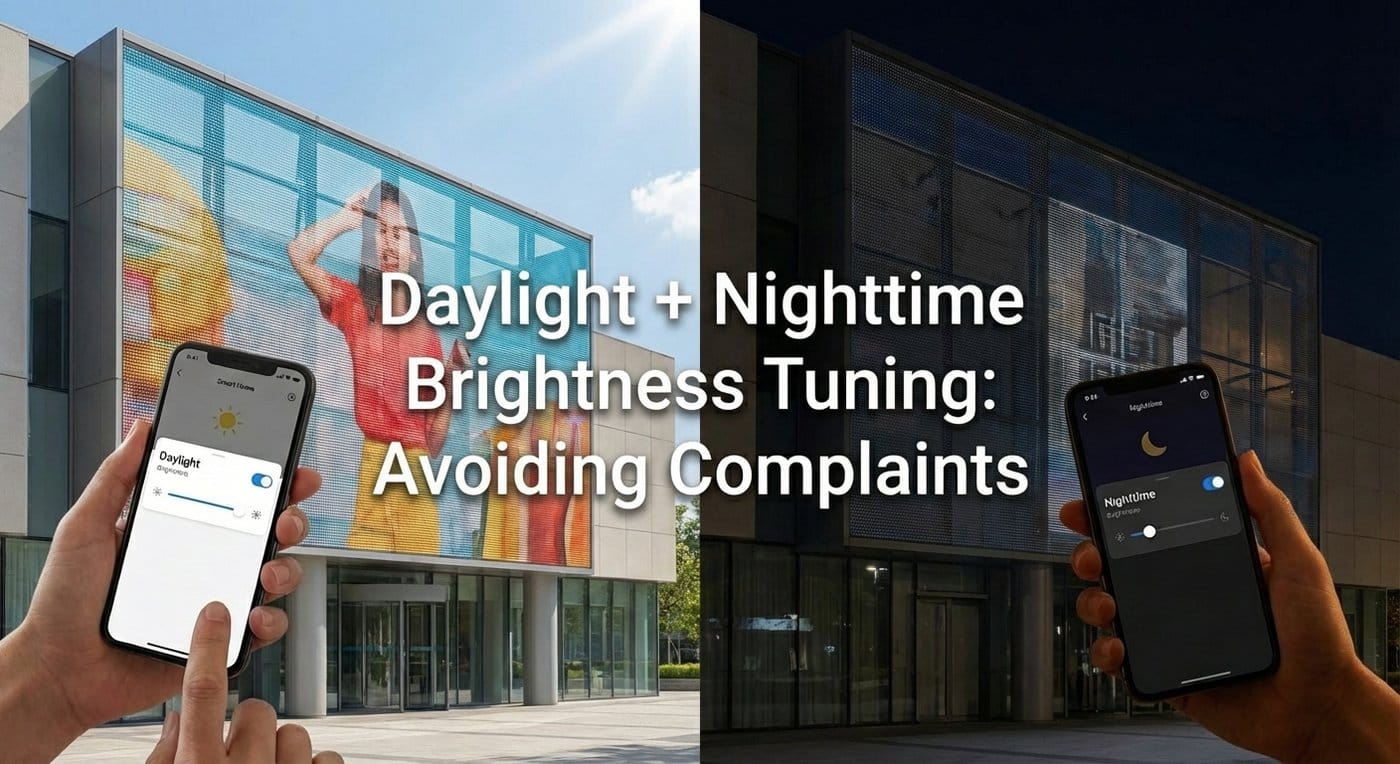
Bright, dynamic storefront displays sell. But if your screen is “that sign” that keeps neighbors awake or draws the wrong kind of attention from the city, you’ll pay for it twice: first in rushed rework, then in permanent operational restrictions.
This guide is written from a commissioning and operations perspective: how to set up day/night brightness tuning (hardware + software + content rules) so you stay visible when you need to—and stay quiet when you should.
I’ll keep this practical and aligned with the way real guidelines and ordinances tend to work: measured outputs, automatic dimming, and anti-distraction rules.
For broader product and application context, start at ChinaLEDScreens. If your project is glass-facing or transparent LED, see transparent LED screen and the use-case planning in Solutions.
Why brightness complaints happen (and why “it looked fine yesterday”)
Most brightness-related complaints come from three groups:
- Neighbors / nearby occupants Their issue is rarely “I can’t see your ad.” It’s: my room is lit up, my curtains glow, I can’t sleep, or your sign flickers in my peripheral vision.
- Drivers / roadway stakeholders The complaint is framed as safety and distraction. Guidelines for electronic message centers explicitly call out glare and driver distraction concerns.
- City planning / code enforcement They don’t judge your content. They judge: measurable brightness, whether it auto-dims, and whether you follow the local rules for message duration and transitions.
Why storefront glass is a multiplier for complaints
Glass adds two optical headaches:
- Reflections: a bright sign can appear brighter because it reflects other lights (street lamps, car headlights).
- Perceived “flash”: high-contrast motion on glass can feel more aggressive than the same content on an indoor wall.
Also: the environment changes. A sign that felt tasteful at 9 PM might be offensive at 1 AM when the street is darker and residents’ eyes are more dark-adapted.
This is why “static settings” fail. You need a control system that behaves well across conditions.
Before you touch brightness settings, align on what you’re measuring.
Nits (cd/m²): what the display emits
A luminance meter (“nit gun”) measures light emitted by the display surface.
A footcandle meter measures illuminance—how much light reaches the viewer’s location or a defined point (often at a set distance).
OAAA’s guidance explains that a nit value is at the source, while what humans experience at distance is illuminance, heavily affected by ambient light and distance.
Why complaints often happen when teams mix these up
- Vendors love quoting nits (easy marketing).
- Cities often regulate impact (spill into environment), which is commonly framed as footcandles over ambient or property-line limits.
- Some places also regulate nighttime nits caps in specific contexts.
Professional rule: You should be able to demonstrate compliance under either framing:
- “We meet the spill limit over ambient at the required distance,” and
- “Our night luminance cap is below X when measured correctly.”
Day/night tuning strategy: how pros commission brightness
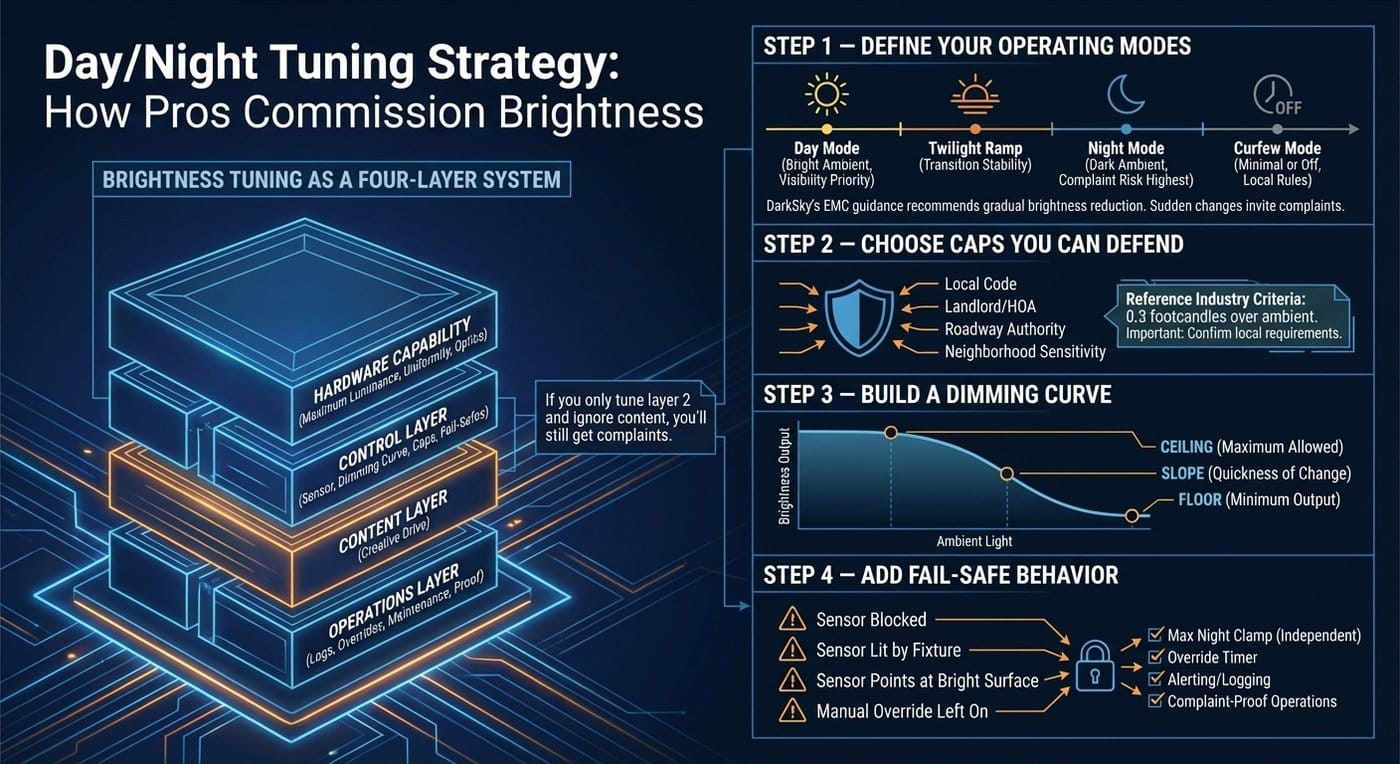
Think of brightness tuning as a system with four layers:
- Hardware capability (maximum luminance, uniformity, optics)
- Control layer (sensor, dimming curve, caps, fail-safes)
- Content layer (how much your creative actually drives luminance)
- Operations layer (logs, overrides, maintenance, proof)
If you only tune layer 2 and ignore content, you’ll still get complaints.
Step 1 — Define your operating modes (don’t stop at “day” and “night”)
A professional setup uses at least four modes:
- Day mode (bright ambient; visibility priority)
- Twilight ramp (sunset → early night; transition stability)
- Night mode (dark ambient; complaint risk highest)
- Curfew mode (late night; minimal brightness or off, depending on local rules)
DarkSky’s EMC guidance explicitly recommends gradual brightness reduction between day and night modes around sunset.
This matters because sudden drops look like “flicker” and sudden increases look like “flash”—both invite complaints.
Step 2 — Choose caps you can defend (and verify locally)
You should build your brightness plan around the stricter of:
- the local code,
- the landlord/HOA requirements,
- the roadway authority constraints, and
- neighborhood sensitivity.
Widely referenced industry criteria include “no more than 0.3 footcandles over ambient” (measured at specified distances). Some regulations also reference explicit nighttime nits caps in defined contexts (example: Nevada regulation).
Important: ordinance details vary by city and zone. Use these numbers as brief anchors, then confirm the actual local requirement before final sign-off.
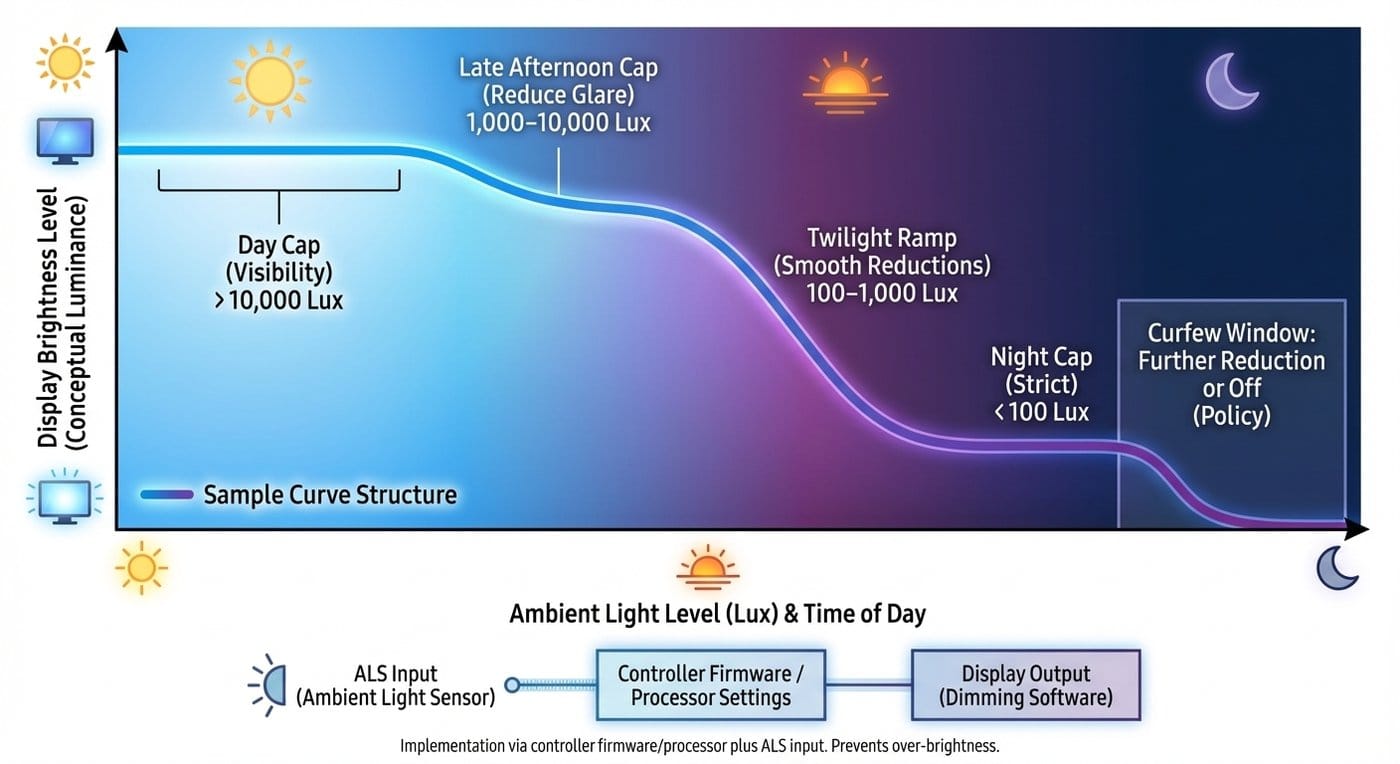
Step 3 — Build a dimming curve (not a single night cap)
A “night cap” alone is crude. What you want is a curve: brightness output as a function of ambient.
A practical curve has:
- Ceiling: maximum allowed output under that ambient range
- Slope: how quickly brightness changes as ambient changes
- Floor: minimum output to avoid unreadable content (and avoid aggressive content compensation later)
A sample curve structure (conceptual)
- > 10,000 lux: Day cap (visibility)
- 1,000–10,000 lux: Late afternoon cap (still bright, but reduce glare)
- 100–1,000 lux: Twilight ramp (smooth reductions)
- < 100 lux: Night cap (strict)
- Curfew window: further reduction or off (policy)
Your integrator should implement this via controller firmware/processor settings plus an ALS input. Daktronics and other industry discussions frame ALS + dimming software as core components to prevent over-brightness.
Step 4 — Add “fail-safe behavior”
Complaints often happen when:
- the sensor is blocked or dirty,
- the sensor is lit by a nearby fixture,
- the sensor points at a bright surface (sign reads “day” all night),
- manual override is left on.
So you need fail-safes:
- Max night clamp independent of sensor
- Override timer (manual boost expires automatically)
- Alerting / logging when brightness exceeds configured thresholds
This is not optional if you want complaint-proof operations.
Sensor + control setup: the mistakes that cause complaints
Sensor placement: “measuring the wrong sky”
If your ALS sees a parking lot light or a streetlight directly, it may read higher ambient than what residents experience—keeping the sign too bright.
Placement principles:
- Avoid direct view of local luminaires
- Avoid being shadowed by the sign structure (which can make it dim too aggressively at dusk)
- Aim at representative sky/ambient, not at reflective glass surfaces
Calibration: match the curve to your neighborhood
Two sites can have the same sign but different acceptable night caps due to:
- residential proximity,
- roadway speed,
- background luminance,
- glass reflections.
So calibrate on-site:
- Set conservative night cap.
- Verify with measurements (footcandle meter at required distance and/or luminance meter).
- Observe from sensitive viewpoints (bedroom windows, sidewalks).
- Adjust the curve slope and floor—not just the cap.
Maintenance: a dirty sensor equals a broken compliance promise
Your O&M plan should include:
- sensor cleaning schedule,
- verification readings quarterly (or after major weather events),
- brightness log review.
Remember: the most common “my sign is too bright tonight” issue is not that the cap changed—it’s that the sensor is lying.
Motion + content brightness rules that prevent complaints
Brightness tuning fails if content is allowed to “weaponize” brightness.
The biggest content mistake: black backgrounds at night
On glass, black often behaves like a mirror. A black background can increase perceived glare because reflections dominate.
Night mode creative rule: Prefer mid-dark plates, controlled gradients, or brand-color backgrounds—avoid pure black fields that become reflective “voids.”
Control APL (Average Picture Level)
High APL content (big bright areas) makes the sign feel brighter even if peak nits are capped. It’s also more likely to exceed spill thresholds.
APL-safe creative patterns:
- dark/mid background + bright text/hero element
- avoid full-screen white
- avoid large bright flashing panels
Avoid flashing and rapid transitions (complaint magnets)
Ordinance-style rules often target refresh rate and motion types. For example, a Santa Monica draft ordinance includes requirements like:
- static image refresh no more often than every 8 seconds,
- fade transitions no less than 1 second,
- no stroboscopic/flashing effects,
- no scrolling text.
Other regulations (example: Nevada) include minimum static message durations depending on area.
Even if your city does not copy these exact values, the pattern is consistent: slow down content changes at night.
Dayparting: different creative for day vs night
You should have two playlists:
- Day playlist: higher contrast, bolder colors, larger type, fewer subtle gradients
- Night playlist: lower APL, calmer motion, longer dwell, softer whites, fewer “attention hacks”
This is how you maintain effectiveness without pushing luminance to the edge.
For inspiration by application type, use Solutions, and for real installations you can model, review Projects & Case Studies.
Complaint triage playbook (what to do when the email comes)
When a complaint arrives, speed matters. But random knob-twisting creates future failure. Use a structured triage.
15-minute diagnosis checklist
- Time + weather: Was it unusually dark? Fog/rain can increase glare perception.
- Sensor reading: Does the ALS value make sense?
- Actual output: What was the brightness setting at the time? Any overrides?
- Content: Was it high APL? flashing? fast transitions?
- Viewpoint: Where was the complainant? Bedroom window? across the street?
- Reflection path: Is there a glass angle that sends a bright reflection into a residence?
Fast fixes (same night)
- Reduce night cap by a clear increment
- Switch to night playlist (low APL + slower transitions)
- Increase message dwell time and add fades (if supported)
- Disable any “boost” modes
Durable fixes (next 1–2 weeks)
- Reposition / shield ALS and recalibrate curve
- Implement curfew mode
- Add logging + lock-out for manual overrides
- Add measurement-based proof (footcandle and/or luminance readings)
If you need a vendor-quality process to standardize this across sites, anchor it in your internal QA workflow (see Technology & Quality).
Storefront + transparent LED specifics (glass-facing projects)
Transparent LED is unique because the “background” is real life. That makes brightness complaints easier to trigger if interior lighting is not managed.
Manage interior lighting at night
If the store interior is very bright, people outside are already glare-adapted to brightness—and your display may feel overly strong by comparison, especially if reflections are present.
Operationally:
- reduce interior luminaires near glass after hours,
- use blinds/lighting zones,
- avoid spotlight beams aimed at the glass plane.
Tune for perceived brightness, not just measured brightness
Two installations can measure similarly but feel different:
- one has a dark street background (sign feels intense),
- one has bright urban background (sign feels moderate).
So your tuning must include field observation from sensitive viewpoints—alongside meter readings.
Align stakeholders early
If you’re quoting and commissioning a glass-facing project, decide upfront:
- What is the night behavior policy? (cap + curfew)
- Who owns compliance logging? (integrator vs operator)
- What is the response SLA to complaints?
If you want help translating these requirements into a project spec and tuning plan for your site conditions, use Contact Us.
A practical “no-surprises” commissioning checklist
Before installation
- Define day/night/curfew modes
- Choose measurement method and acceptance criteria (fc over ambient and/or nits cap)
- Define motion rules for night (longer dwell, fades, no flashing/scrolling)
At commissioning
- Place ALS correctly and record location
- Implement curve + hard night clamp + override timer
- Validate at: late afternoon, after sunset, late night
- Document readings + photos from sensitive viewpoints
Ongoing operations
- Quarterly verification and sensor cleaning
- Night playlist enforced automatically
- Complaint response playbook (fast fix + durable fix)
Closing: the “professional” mindset that prevents complaints
If you treat brightness tuning as a one-time setting, you’ll eventually lose—because seasons, weather, and surroundings change.
If you treat it as a system (sensor + curve + caps + content + operations), you can stay visible in daylight and be a quiet neighbor at night—without sacrificing performance.
For a complete project approach (product selection + commissioning + QA), start from ChinaLEDScreens, review transparent LED screen for glass-facing deployments, and standardize acceptance criteria through Technology & Quality.